SKU: OT5490 Numer artykułu: XW064 EAN: 8720828223642

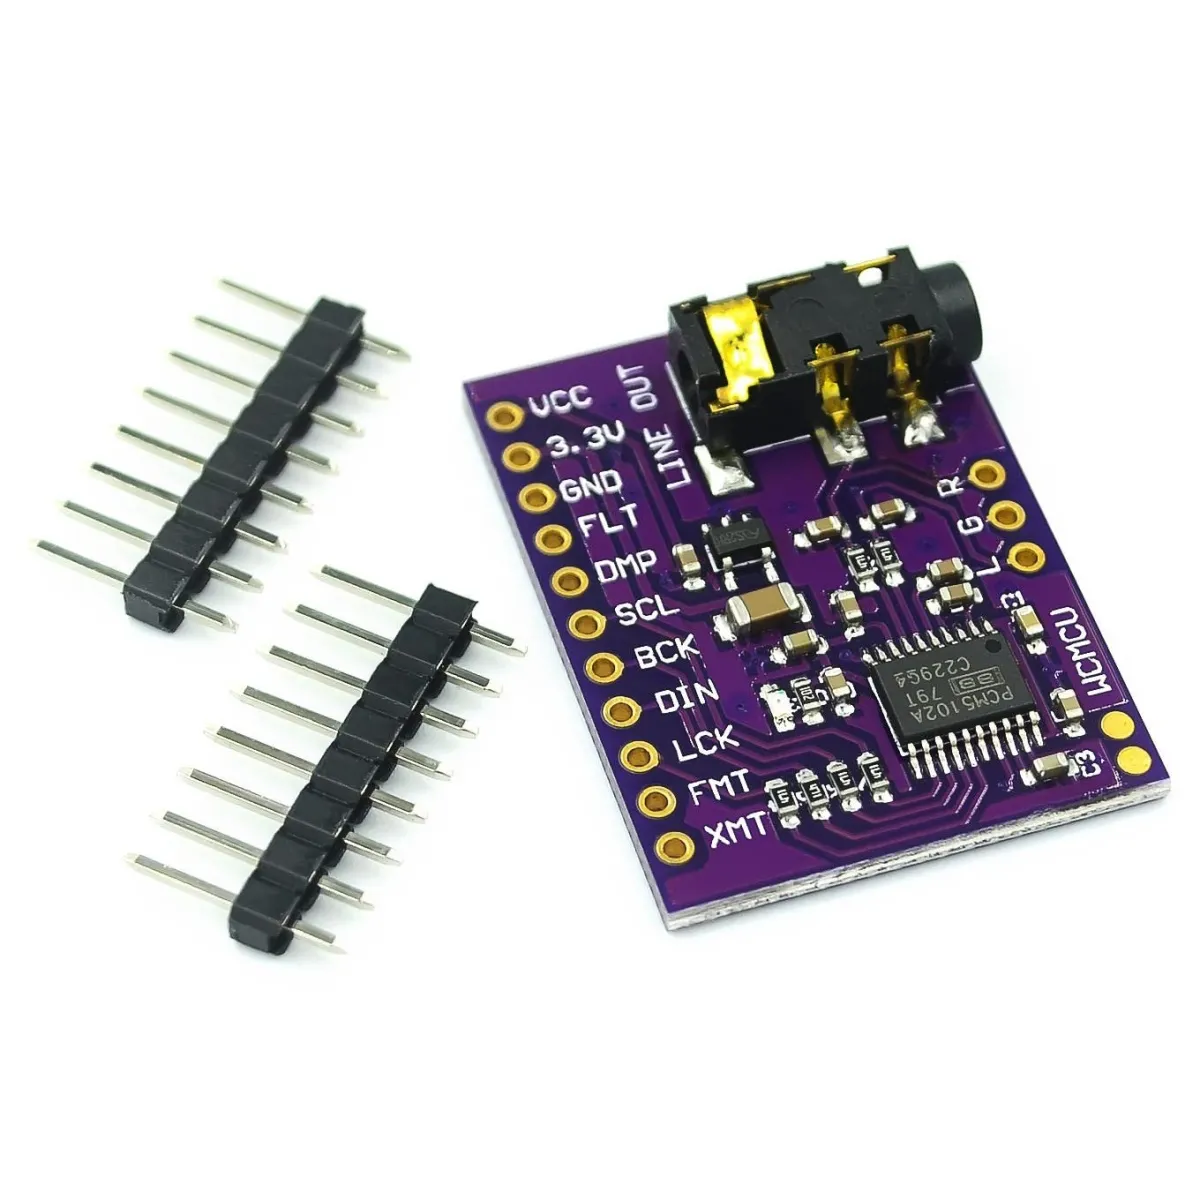
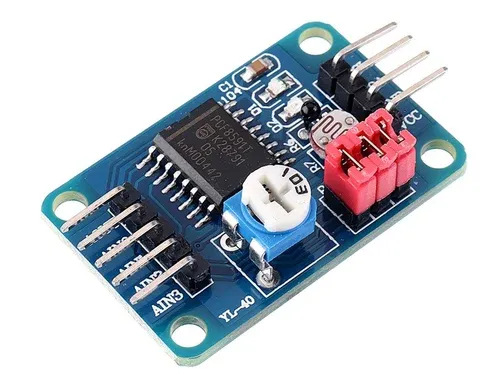
Ten PCM5102A to moduł przetwornika cyfrowo-analogowego (DAC), przeznaczony głównie do konwersji cyfrowych informacji audio na analogowy sygnał audio.
Specyfikacja techniczna:
Rozdzielczość: PCM5102A obsługuje dźwięk o wysokiej rozdzielczości z głębią bitową do 32 bitów i częstotliwościami próbkowania do 384 kHz.
Direct Path Architecture: Jedną z unikalnych cech PCM5102A jest architektura „Direct Path”, która umożliwia bezpośrednie przesyłanie sygnału na wyjście bez potrzeby stosowania zewnętrznego wzmacniacza operacyjnego ani kondensatora odsprzęgającego DC.
Łączność: PCM5102A korzysta z interfejsu I2S, powszechnie używanego w zastosowaniach audio do przesyłania cyfrowego sygnału audio między komponentami.
Napięcie zasilania: 3,3 V do 5 V.
Tak podłączysz WCMCU-5102 moduł stereo DAC przetwornik cyfrowo-analogowy do Arduino UNO lub ESP32, z przykładowym szkicem, który możesz od razu wgrać.
Ten przykład pokazuje, jak zasilać i konfigurować moduł DAC PCM5102A za pomocą Arduino Uno. Sketch ustawia piny konfiguracji sprzętowej (mute, format, system clock, de-emphasis i filter) oraz wyświetla stan modułu w Serial Monitor. Pamiętaj, że analogowe wyjście audio ma poziom line-level i powinno być podłączone do headphones lub wzmacniacza, nigdy bezpośrednio do speaker.
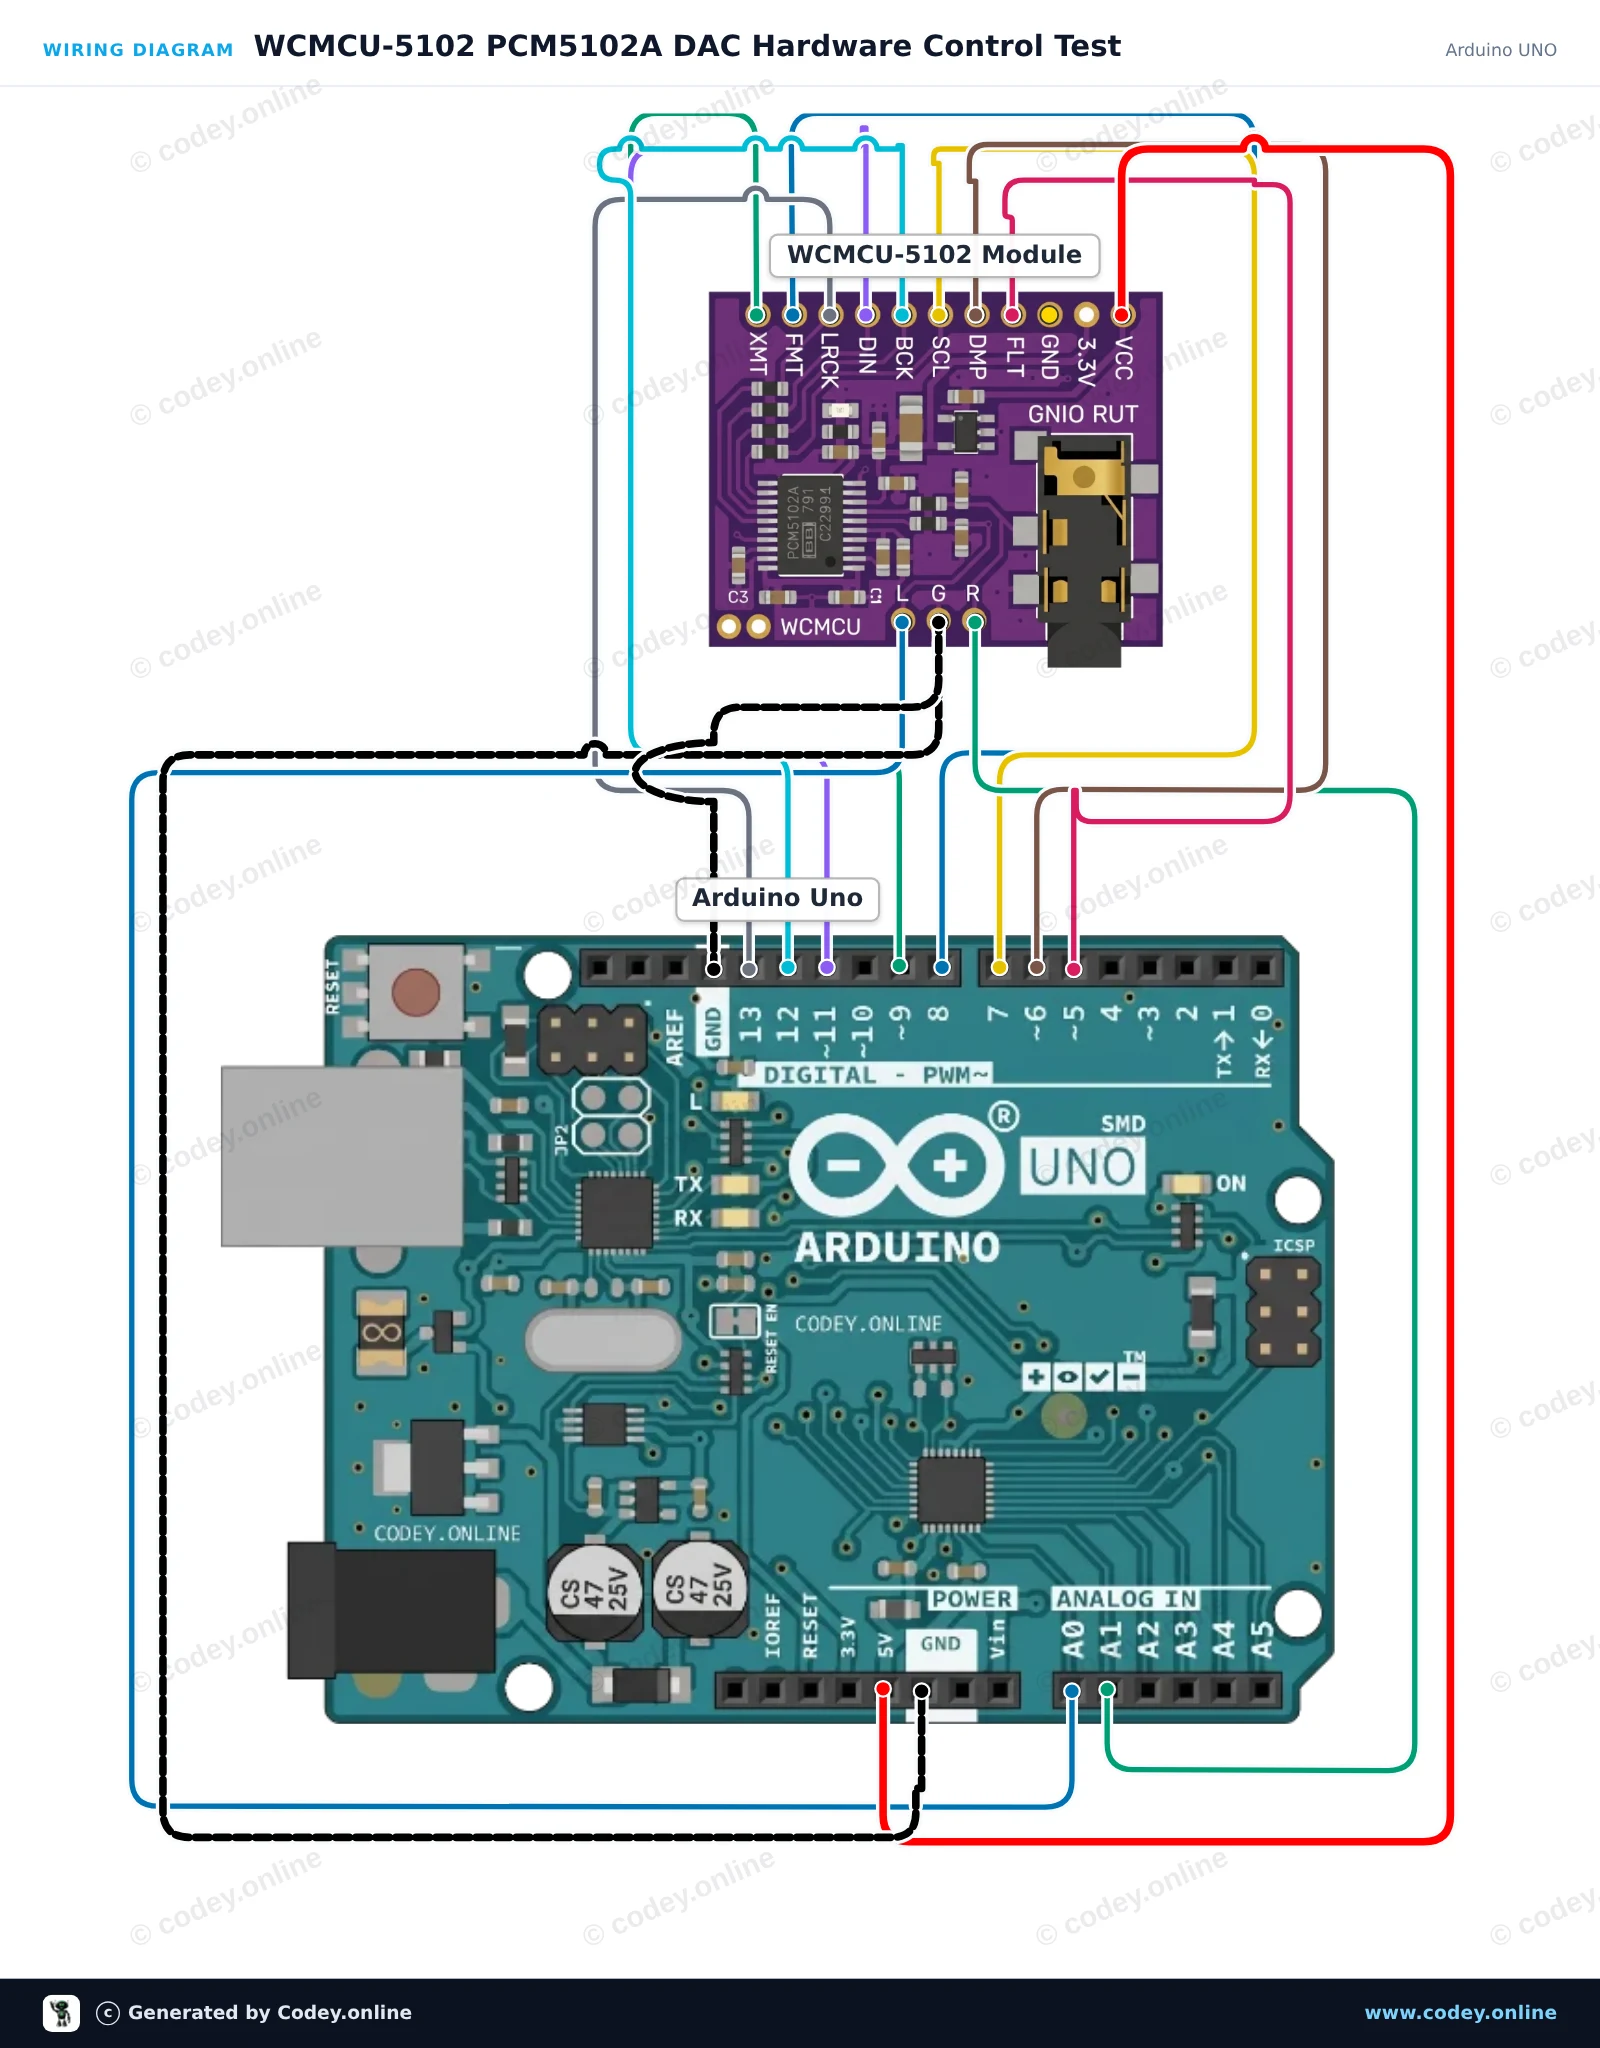
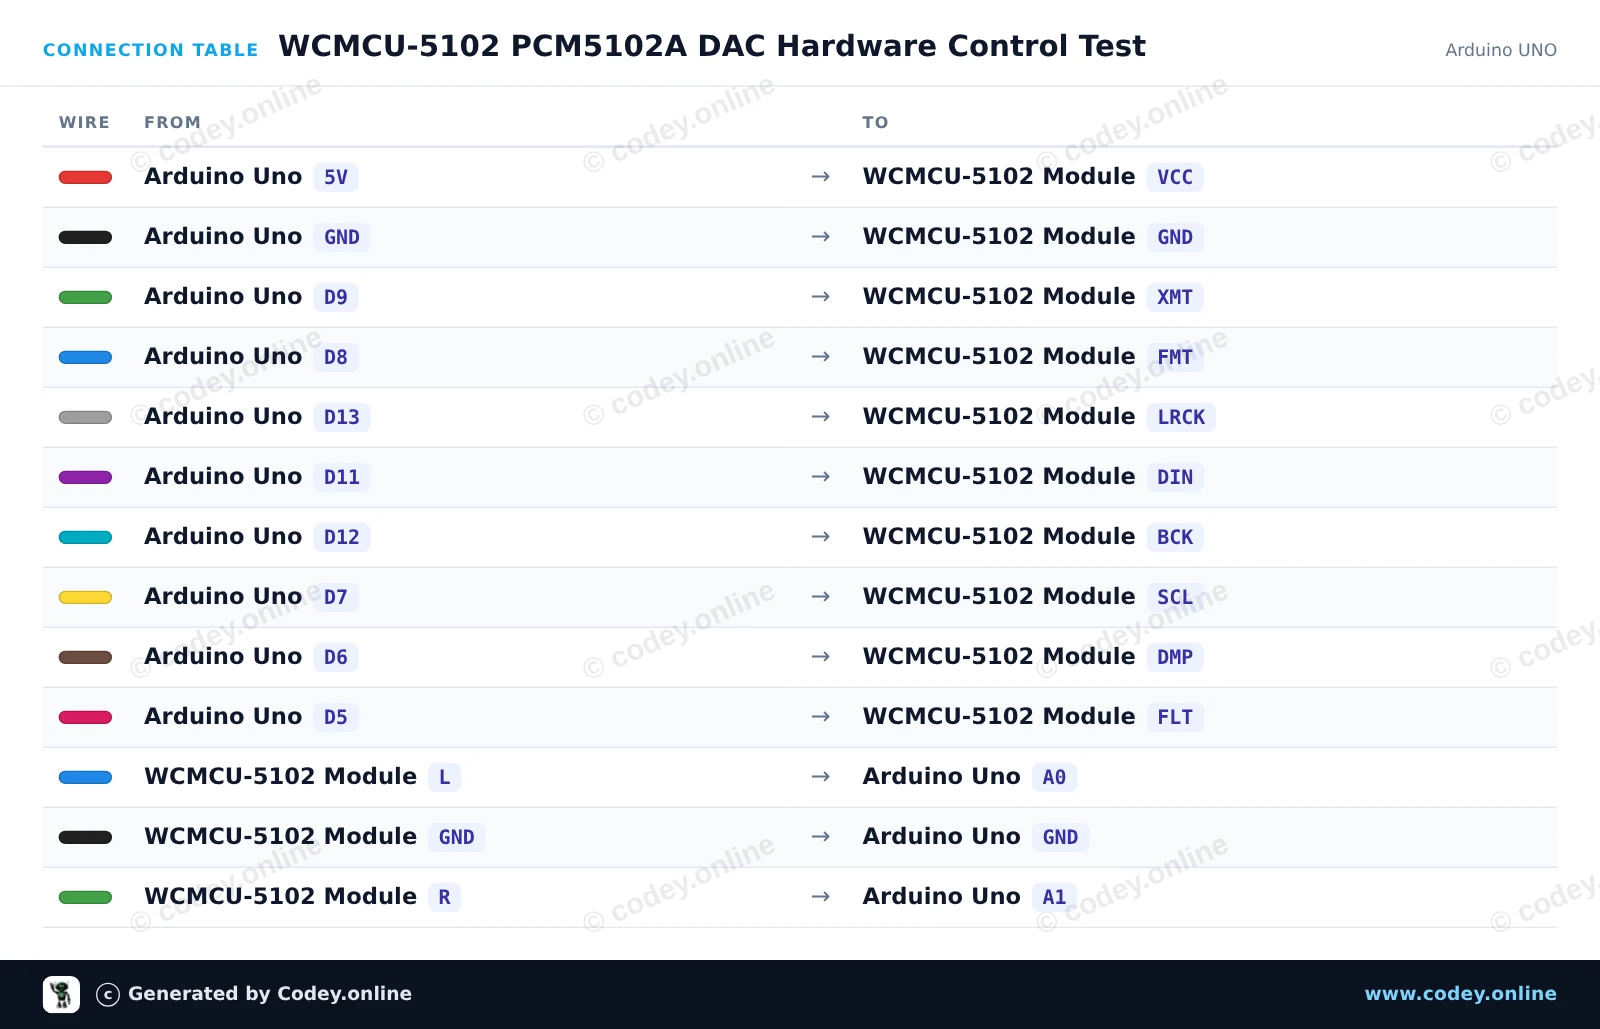
/*
 * ==================================================================
 *  Generated by Codey.online  —  https://www.codey.online
 * ==================================================================
 *  Project   : WCMCU-5102 PCM5102A DAC Hardware Control Test
 *  Board     : Arduino UNO (arduino:avr:uno)
 *  Parts     : WCMCU-5102 module
 *  Libraries : none (built-in)
 *
 *  Codey Online is an AI-powered browser IDE for Arduino and ESP32.
 *  Describe your project and Codey writes the code, draws the wiring
 *  diagram and uploads it to your board, straight from the browser.
 *  This code is free to use, modify and share, without warranty.
 * ==================================================================
 */

// WCMCU-5102 (PCM5102A) DAC Module Control Example
// Configures hardware control pins and toggles the unmute (XMT) signal.

const int PIN_XMT = 9;  // High = Unmute, Low = Soft mute
const int PIN_FMT = 8;  // Low = I2S format
const int PIN_SCL = 7;  // Low = Internal SCK generation
const int PIN_DMP = 6;  // Low = De-emphasis off
const int PIN_FLT = 5;  // Low = Normal latency filter

void setup() {
  Serial.begin(115200);
  while (!Serial);

  pinMode(PIN_XMT, OUTPUT);
  pinMode(PIN_FMT, OUTPUT);
  pinMode(PIN_SCL, OUTPUT);
  pinMode(PIN_DMP, OUTPUT);
  pinMode(PIN_FLT, OUTPUT);

  // Configure default PCM5102A operating modes
  digitalWrite(PIN_FMT, LOW);  // Set standard I2S format
  digitalWrite(PIN_SCL, LOW);  // Generate system clock internally
  digitalWrite(PIN_DMP, LOW);  // Disable de-emphasis filter
  digitalWrite(PIN_FLT, LOW);  // Normal latency filter
  digitalWrite(PIN_XMT, HIGH); // Unmute DAC output

  Serial.println(F("WCMCU-5102 DAC Initialized"));
  Serial.println(F("Configuration: I2S format, internal SCK, unmute active."));
  Serial.println(F("Note: Connect line outputs (L/R) to an amplifier or headphones."));
}

void loop() {
  // Periodic status display
  Serial.println(F("PCM5102A module active and unmuted."));
  delay(2000);
}Wiring diagram and example code generated by Codey.online — https://www.codey.online
Ten projekt łączy ESP32 z stereofonicznym DAC PCM5102A przez cyfrowy interfejs audio I2S, aby wygenerować krystalicznie czysty ton testowy 440 Hz. Podłącz standardowe słuchawki 3.5mm lub wzmacniacz liniowy do gniazda audio, aby usłyszeć wyjście stereo. Szkic generuje czystą falę sinusoidalną 16-bit przy częstotliwości próbkowania 44.1 kHz, korzystając z programowego interfejsu sprzętowego I2S.
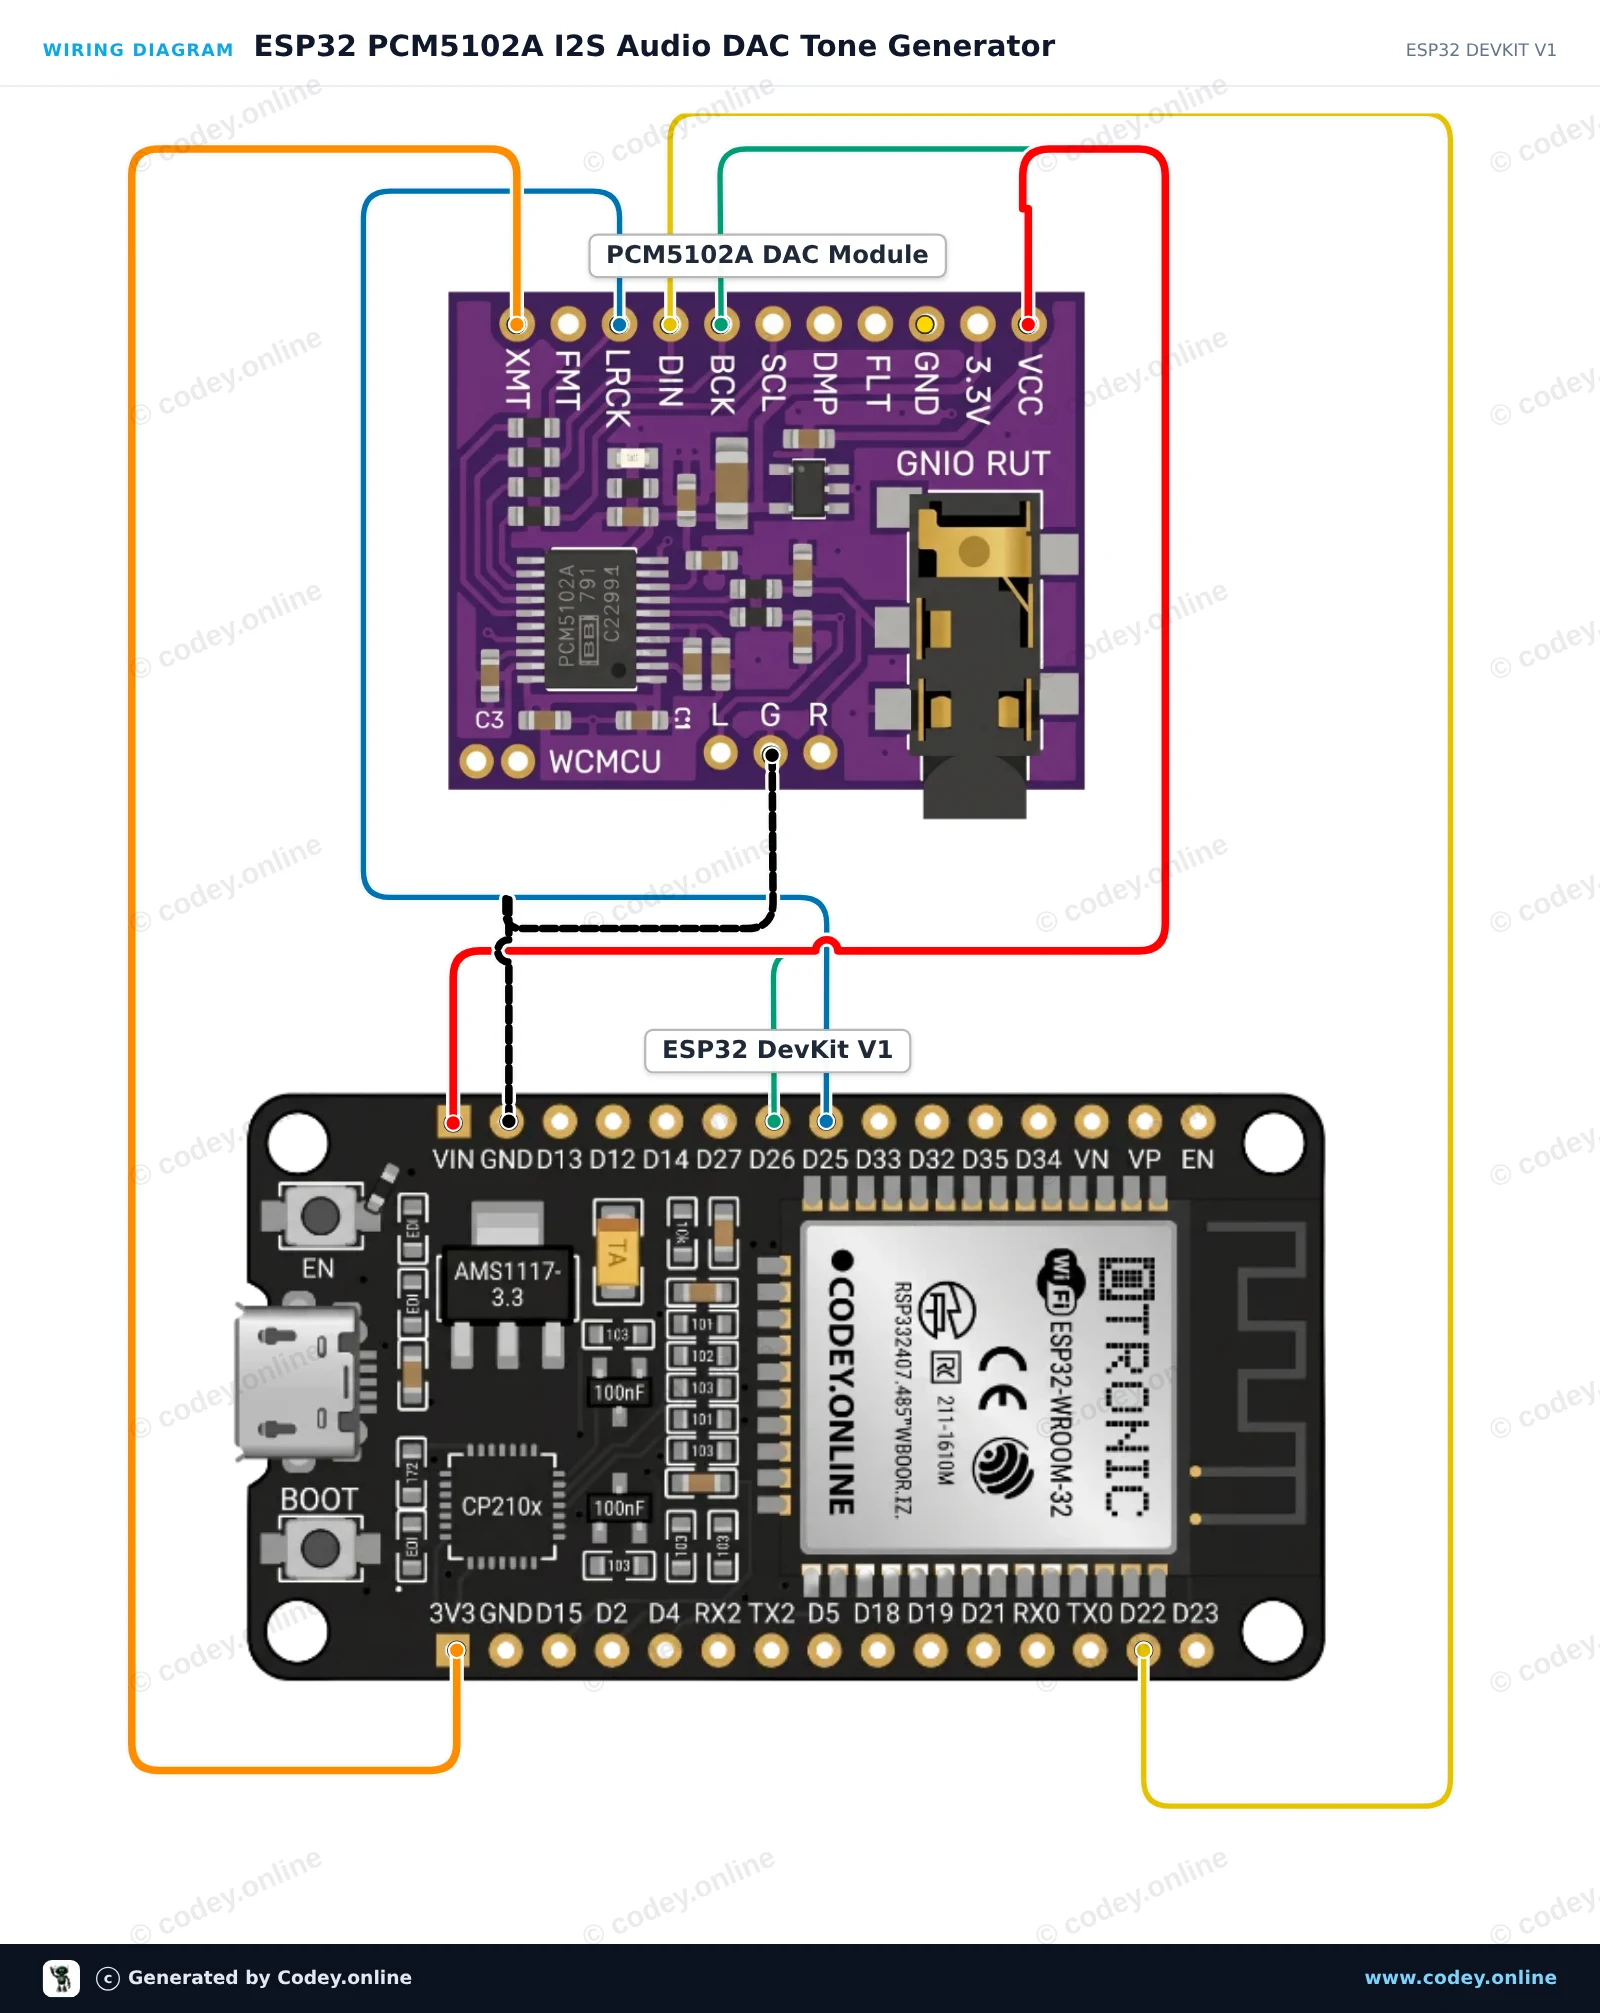
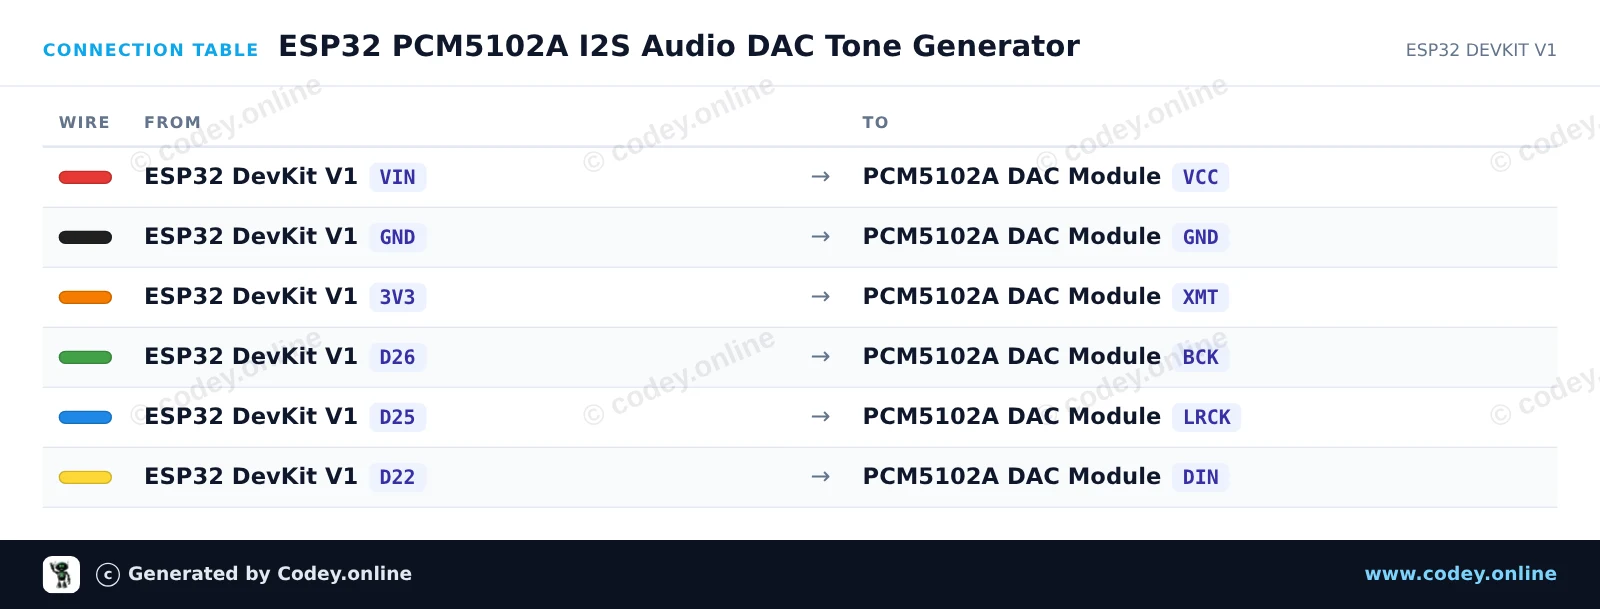
/*
 * ==================================================================
 *  Generated by Codey.online  —  https://www.codey.online
 * ==================================================================
 *  Project   : ESP32 PCM5102A I2S Audio DAC Tone Generator
 *  Board     : ESP32 DEVKIT V1 (esp32:esp32:esp32doit-devkit-v1)
 *  Parts     : WCMCU-5102 module
 *  Libraries : none (built-in)
 *
 *  Codey Online is an AI-powered browser IDE for Arduino and ESP32.
 *  Describe your project and Codey writes the code, draws the wiring
 *  diagram and uploads it to your board, straight from the browser.
 *  This code is free to use, modify and share, without warranty.
 * ==================================================================
 */

#include <Arduino.h>
#include "driver/i2s.h"
#include <math.h>

#define I2S_BCK_PIN   26
#define I2S_LRCK_PIN  25
#define I2S_DATA_PIN  22

const int SAMPLE_RATE = 44100;
const int TABLE_SIZE  = 128;
int16_t sineTable[TABLE_SIZE];

void setup() {
  Serial.begin(115200);
  Serial.println("ESP32 PCM5102A Audio Test");

  // Generate one period of a sine wave in a lookup table
  for (int i = 0; i < TABLE_SIZE; i++) {
    sineTable[i] = (int16_t)(sin(2.0 * PI * i / TABLE_SIZE) * 10000);
  }

  // Configure I2S peripheral
  i2s_config_t i2s_config = {
    .mode = (i2s_mode_t)(I2S_MODE_MASTER | I2S_MODE_TX),
    .sample_rate = SAMPLE_RATE,
    .bits_per_sample = I2S_BITS_PER_SAMPLE_16BIT,
    .channel_format = I2S_CHANNEL_FMT_RIGHT_LEFT,
    .communication_format = I2S_COMM_FORMAT_STAND_I2S,
    .intr_alloc_flags = ESP_INTR_FLAG_LEVEL1,
    .dma_buf_count = 8,
    .dma_buf_len = 64,
    .use_apll = false,
    .tx_desc_auto_clear = true
  };

  i2s_pin_config_t pin_config = {
    .bck_io_num = I2S_BCK_PIN,
    .ws_io_num = I2S_LRCK_PIN,
    .data_out_num = I2S_DATA_PIN,
    .data_in_num = I2S_PIN_NO_CHANGE
  };

  i2s_driver_install(I2S_NUM_0, &i2s_config, 0, NULL);
  i2s_set_pin(I2S_NUM_0, &pin_config);

  Serial.println("Playing continuous 440 Hz stereo tone...");
}

void loop() {
  size_t bytesWritten = 0;
  // Stream stereo samples (left and right channels)
  for (int i = 0; i < TABLE_SIZE; i++) {
    int16_t stereoSample[2] = { sineTable[i], sineTable[i] };
    i2s_write(I2S_NUM_0, stereoSample, sizeof(stereoSample), &bytesWritten, portMAX_DELAY);
  }
}Wiring diagram and example code generated by Codey.online — https://www.codey.online





 English
  Nederlands
  Frans
Frans  Deutsch
  Italiano
  Español
  Suomi
Suomi  Dansk
Dansk  Ελληνικά
  Български
  Čeština
  Hrvatski
  Svenska
  Aileen