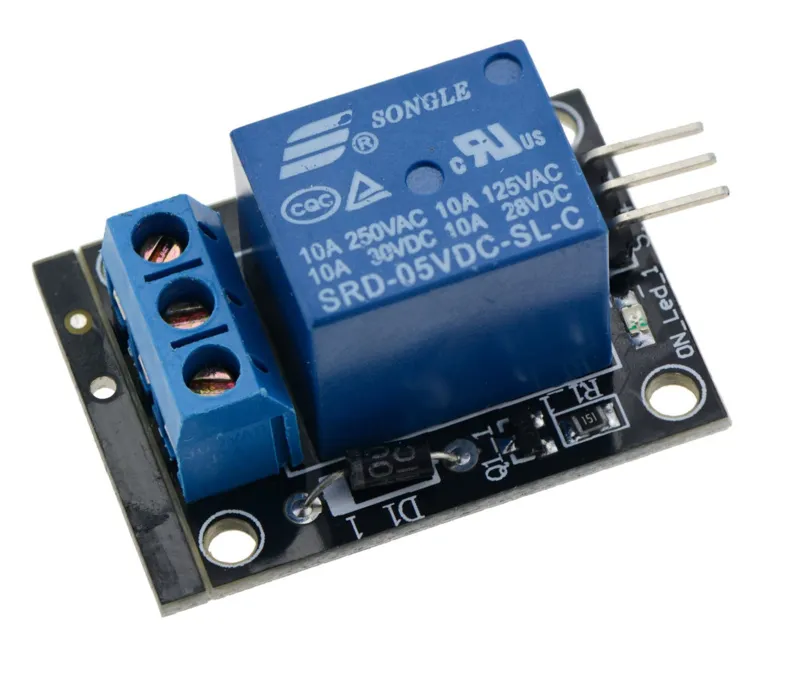
SKU: OT961-C105 Numer artykułu: YP924 EAN: 4639867568390

Słowa kluczowe: relais 5v, 5v relais, relay 5v, 5v relay, relais hoog, relais high, relay high, blauwe relais, relais blauw, relais 250v, relais 220v, relais voor arduino, arduino relais, relais breadboard
Wymiary
Długość: 3,3cm
Szerokość: 2,6cm
Wysokość: 1,7cm
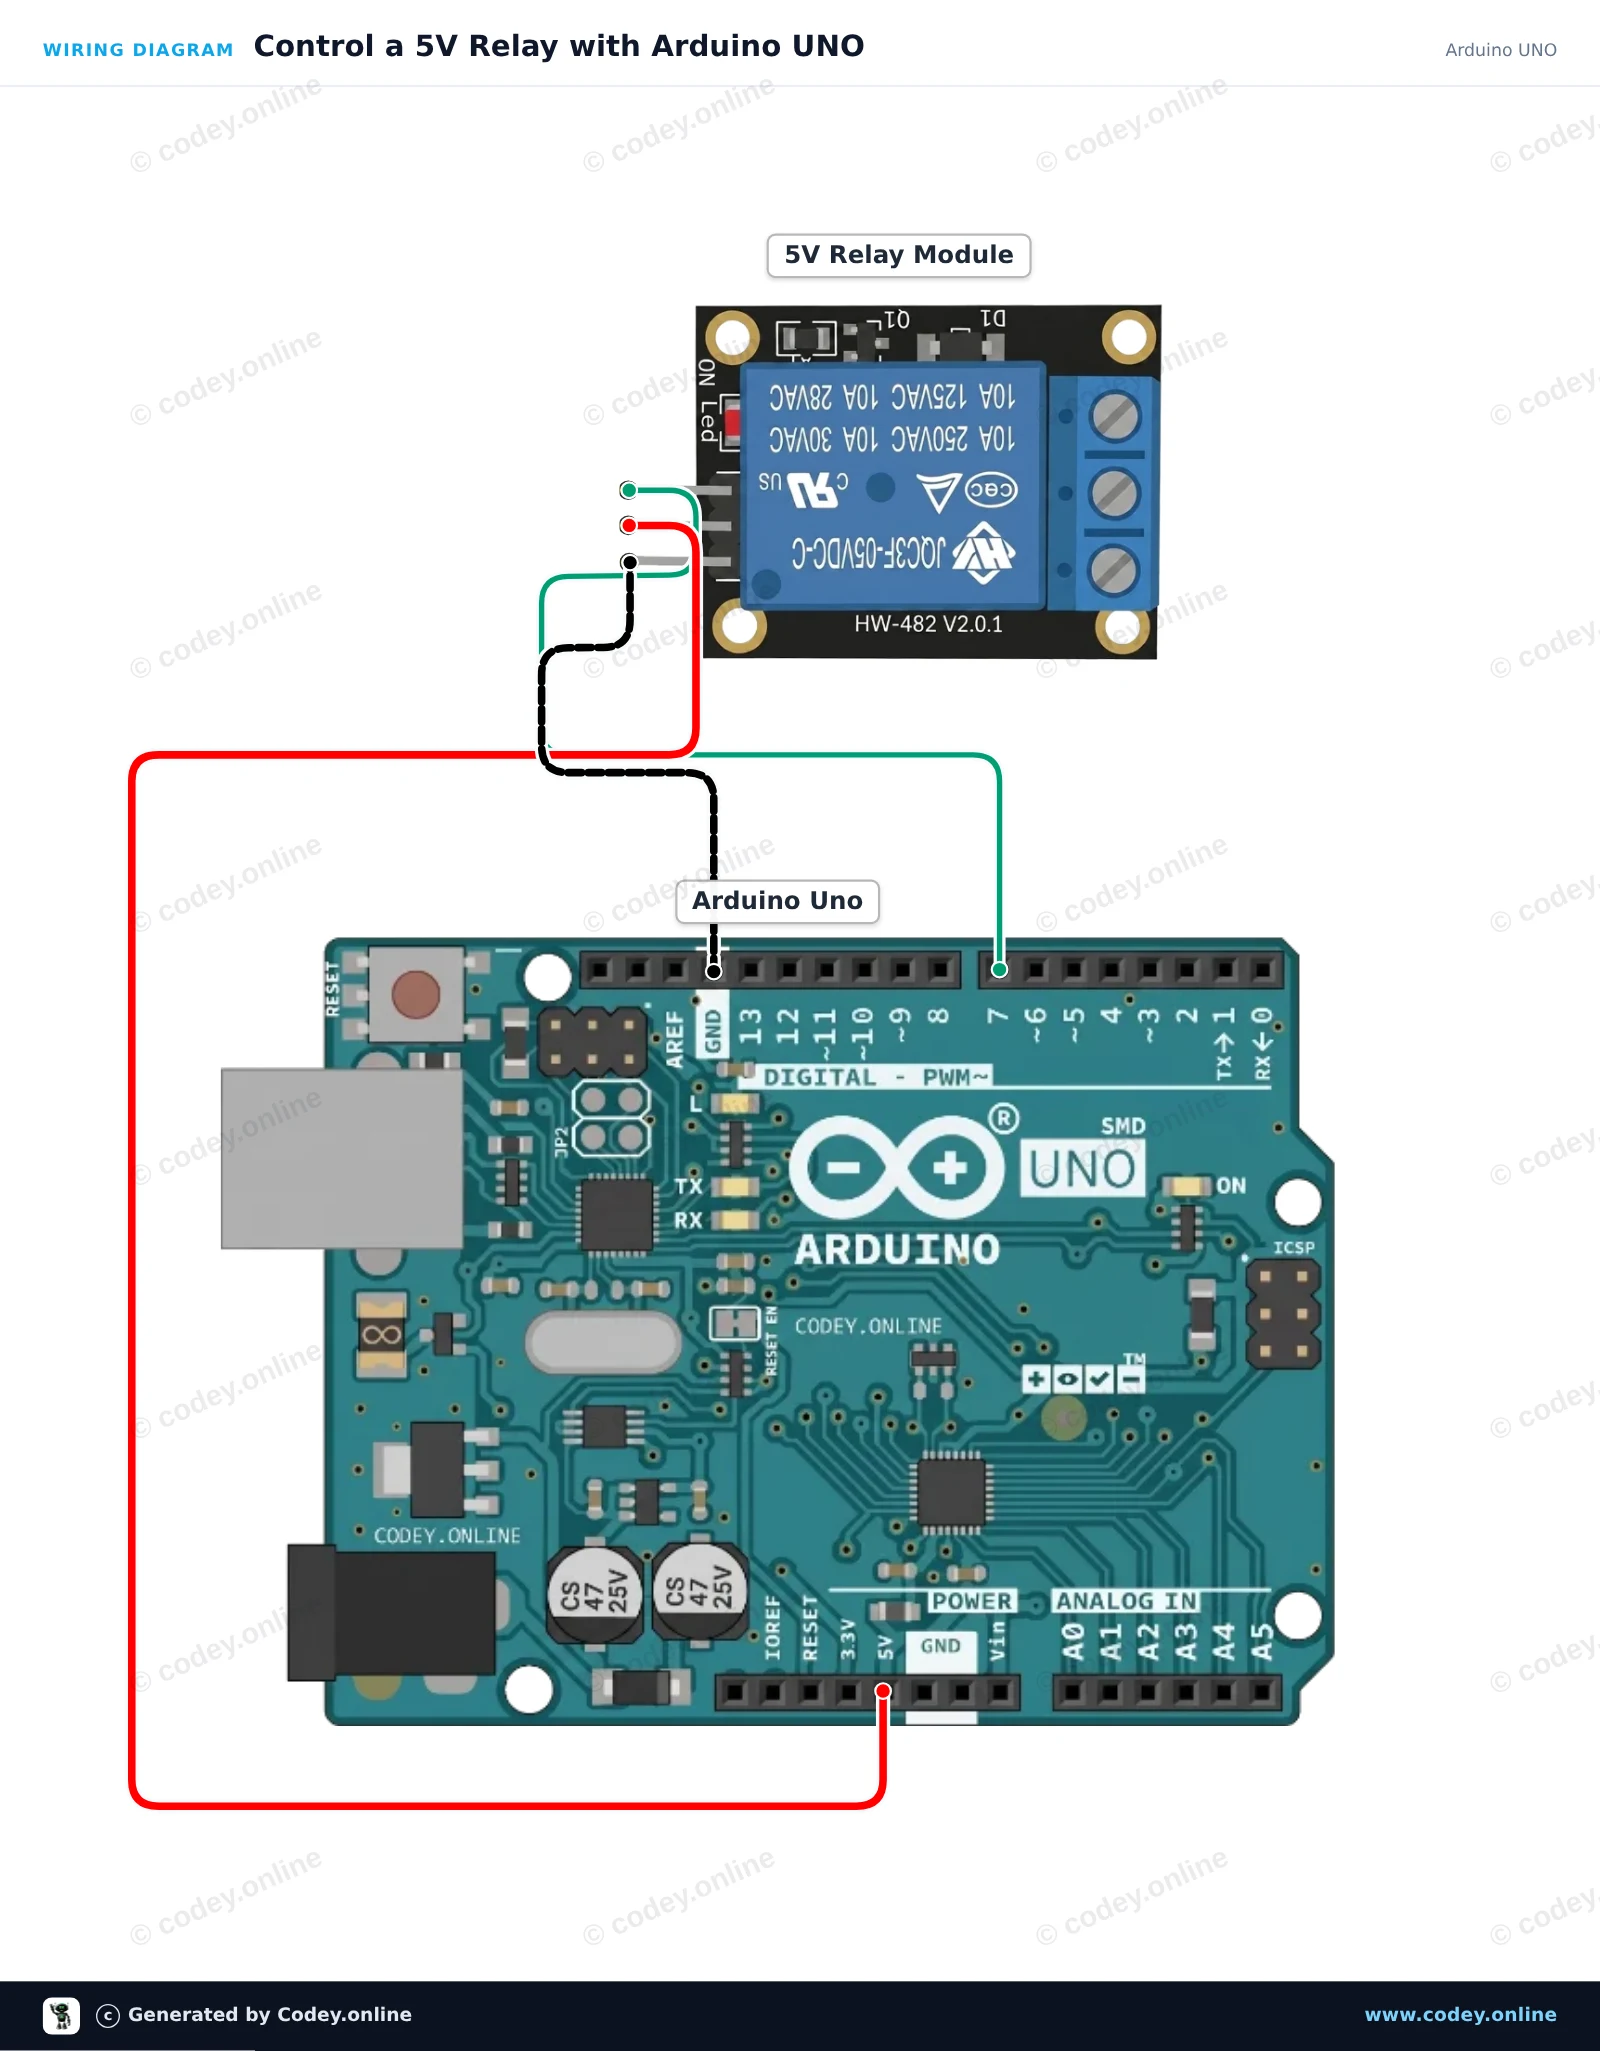
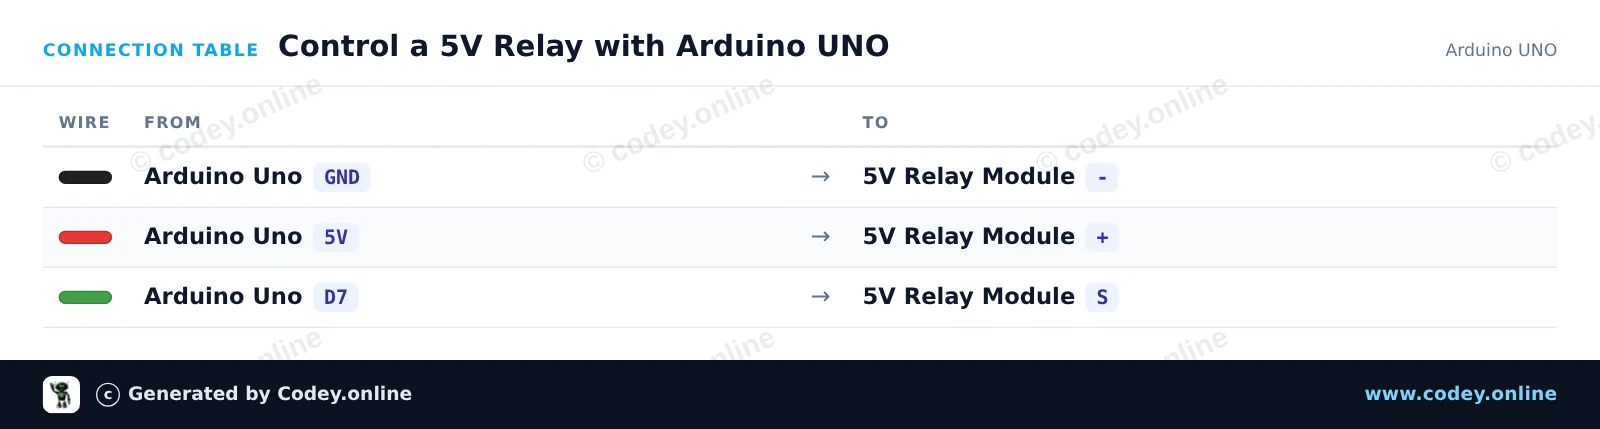
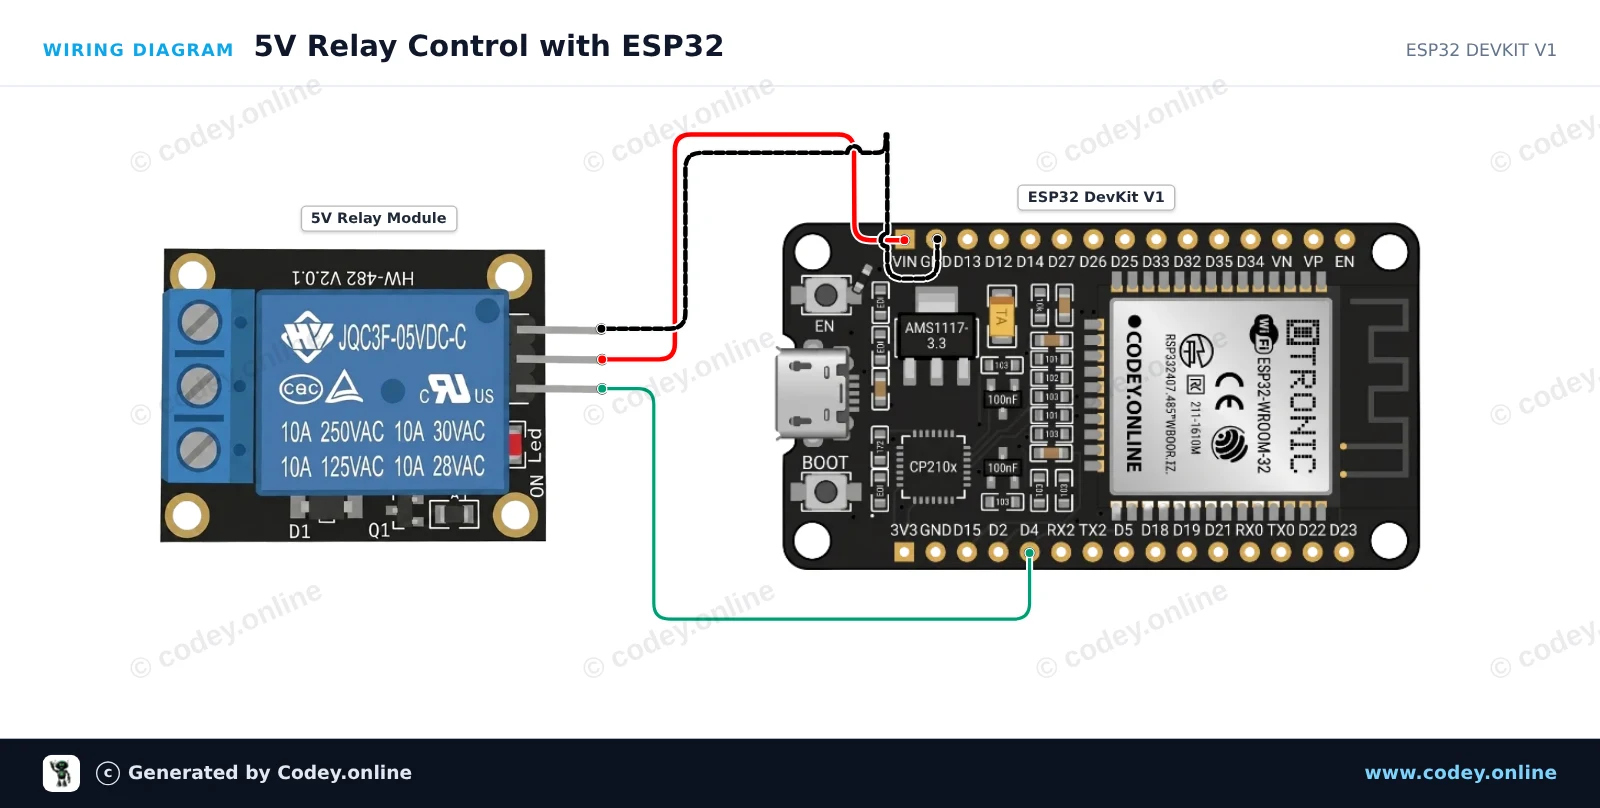
Tak podłączysz Moduł przekaźnika 5v do Arduino do Arduino UNO lub ESP32, z przykładowym szkicem, który możesz od razu wgrać.
Ten projekt pokazuje, jak sterować modułem przekaźnika 5V za pomocą Arduino UNO. Sketch przełącza przekaźnik ON i OFF co dwie sekundy, jednocześnie wyświetlając status w Serial Monitor. Za każdym razem, gdy przekaźnik zmienia stan, usłyszysz charakterystyczne kliknięcie.
/*
 * ==================================================================
 *  Generated by Codey.online  —  https://www.codey.online
 * ==================================================================
 *  Project   : Control a 5V Relay with Arduino UNO
 *  Board     : Arduino UNO (arduino:avr:uno)
 *  Parts     : Relay Module 5V
 *  Libraries : none (built-in)
 *
 *  Codey Online is an AI-powered browser IDE for Arduino and ESP32.
 *  Describe your project and Codey writes the code, draws the wiring
 *  diagram and uploads it to your board, straight from the browser.
 *  This code is free to use, modify and share, without warranty.
 * ==================================================================
 */

// 5V Relay Module Example
const int RELAY_PIN = 7;

void setup() {
  pinMode(RELAY_PIN, OUTPUT);
  Serial.begin(115200);
  Serial.println(F("Relay module demo started."));
}

void loop() {
  // Turn relay ON
  digitalWrite(RELAY_PIN, HIGH);
  Serial.println(F("Relay: ON"));
  delay(2000);

  // Turn relay OFF
  digitalWrite(RELAY_PIN, LOW);
  Serial.println(F("Relay: OFF"));
  delay(2000);
}Wiring diagram and example code generated by Codey.online — https://www.codey.online
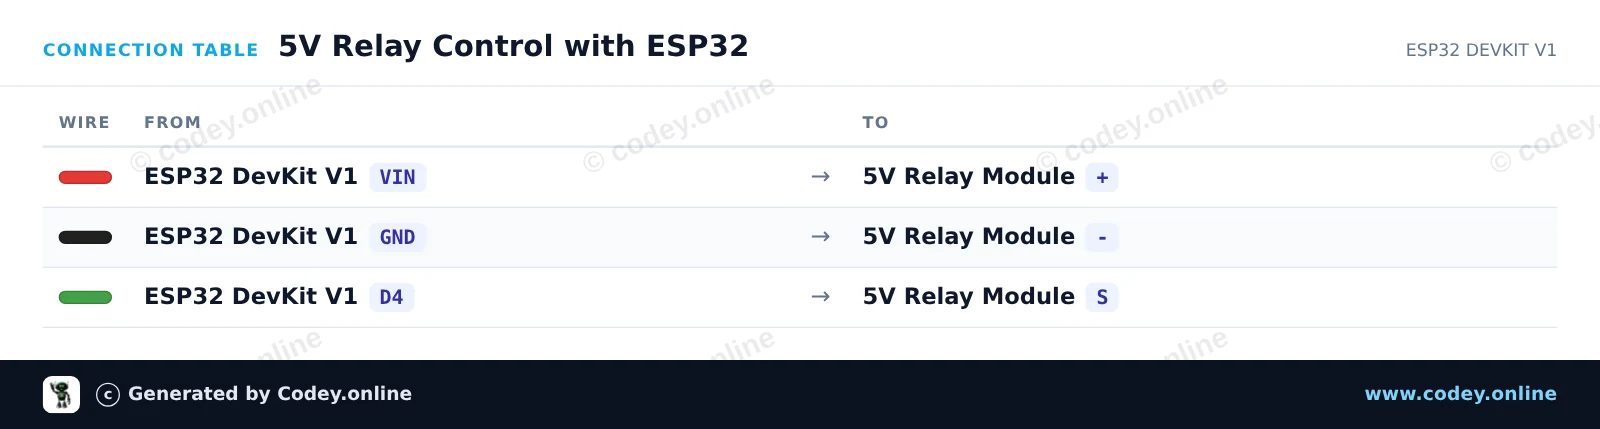
Ten projekt pokazuje, jak sterować modułem przekaźnika 5V za pomocą ESP32. Przekaźnik włącza się i wyłącza co dwie sekundy, jednocześnie wypisując swój stan w Serial Monitor. Przekaźnik jest zasilany bezpośrednio z pinu VIN ESP32 (5V z USB) i sterowany przez GPIO 4.
/*
 * ==================================================================
 *  Generated by Codey.online  —  https://www.codey.online
 * ==================================================================
 *  Project   : 5V Relay Control with ESP32
 *  Board     : ESP32 DEVKIT V1 (esp32:esp32:esp32doit-devkit-v1)
 *  Parts     : Relay Module 5V
 *  Libraries : none (built-in)
 *
 *  Codey Online is an AI-powered browser IDE for Arduino and ESP32.
 *  Describe your project and Codey writes the code, draws the wiring
 *  diagram and uploads it to your board, straight from the browser.
 *  This code is free to use, modify and share, without warranty.
 * ==================================================================
 */

// 5V Relay Control Example for ESP32
const int RELAY_PIN = 4;

void setup() {
  Serial.begin(115200);
  pinMode(RELAY_PIN, OUTPUT);
  digitalWrite(RELAY_PIN, LOW);
  Serial.println("Relay control initialized.");
}

void loop() {
  // Turn relay ON (Active HIGH for standard modules)
  Serial.println("Relay: ON");
  digitalWrite(RELAY_PIN, HIGH);
  delay(2000);

  // Turn relay OFF
  Serial.println("Relay: OFF");
  digitalWrite(RELAY_PIN, LOW);
  delay(2000);
}Wiring diagram and example code generated by Codey.online — https://www.codey.online






 English
  Nederlands
  Frans
Frans  Deutsch
  Italiano
  Español
  Suomi
Suomi  Dansk
Dansk  Ελληνικά
  Български
  Čeština
  Hrvatski
  Aileen